
· One min read

image

Data is important. If you're moving your business to the cloud to take advantage of the cloud-native features, the first thing you need to consider might be how to load your data to the cloud.

There are many ways to load data into Databend. You can use the command-line interface (CLI), API, or the mysqldump client utility, depending on where your data is stored.

image

The powerful COPY INTO commands allow you to load data from:

  • Files in an S3 bucket or a blob storage container.
  • Staged files (internal or external).
  • Files in a remote server.

If you have local data files to load, use the HTTP API v1/streaming_load to upload them to Databend.

Please note that Databend supports loading data from files in these formats:

  • CSV
  • JSON
  • Parquet

If you're coming from MySQL, Databend can also use a dump file (*.sql) created by the mysqldump client utility to load your data from MySQL.

Detailed explanations about loading data in different scenarios can be found at https://databend.rs/doc/load-data.

· 5 min read
tip

This post was originally published by Anne-Laure Civeyrac on https://mergify.com.

image

Every day, major projects use Mergify to automate their GitHub workflow. Whether they have a core team of 3 or 50 people, the one thing they all have in common is that the project leads are willing to let their developers focus on what’s really important—code. So we decided to meet with some of them to get to know more about the challenges they face and discover how Mergify helps their teams be more efficient when it comes to pull requests. This time, we sat down (virtually) with Xuanwo, an infrastructure engineer who oversees automation, distributed systems and storage for the Databend project.

image

Xuanwo

Please could you give us a brief outline of the Databend project.

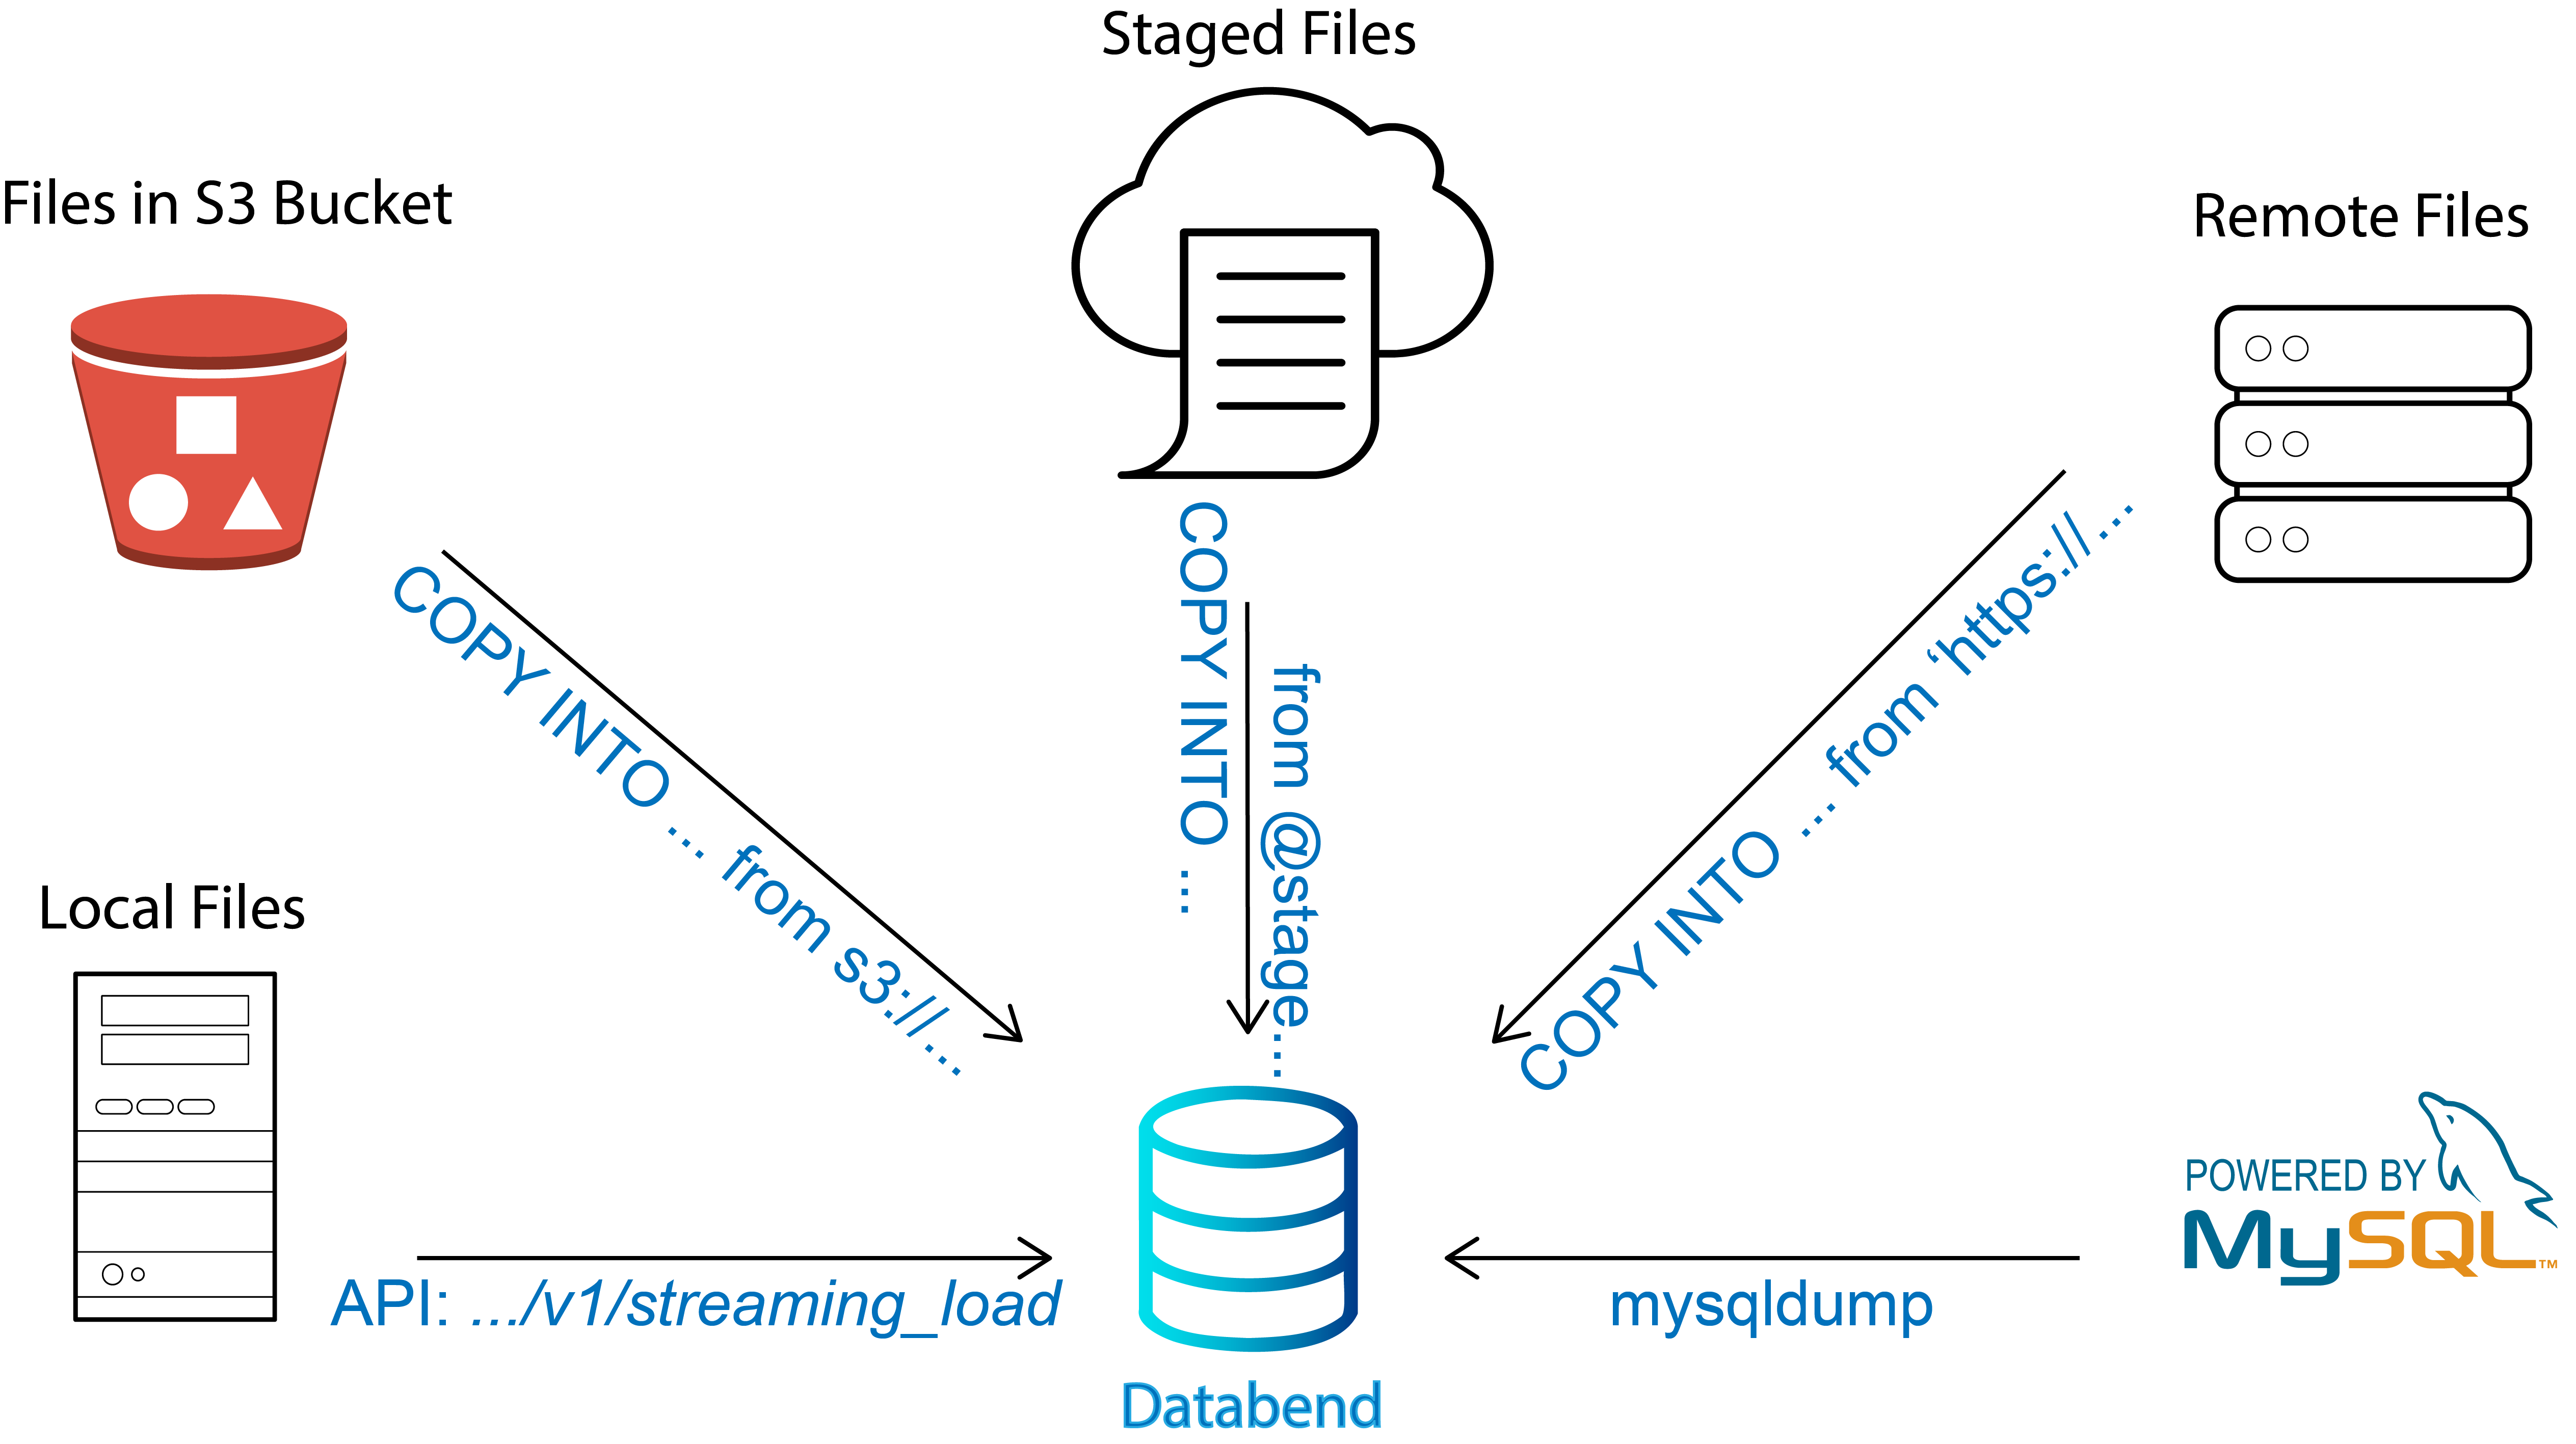
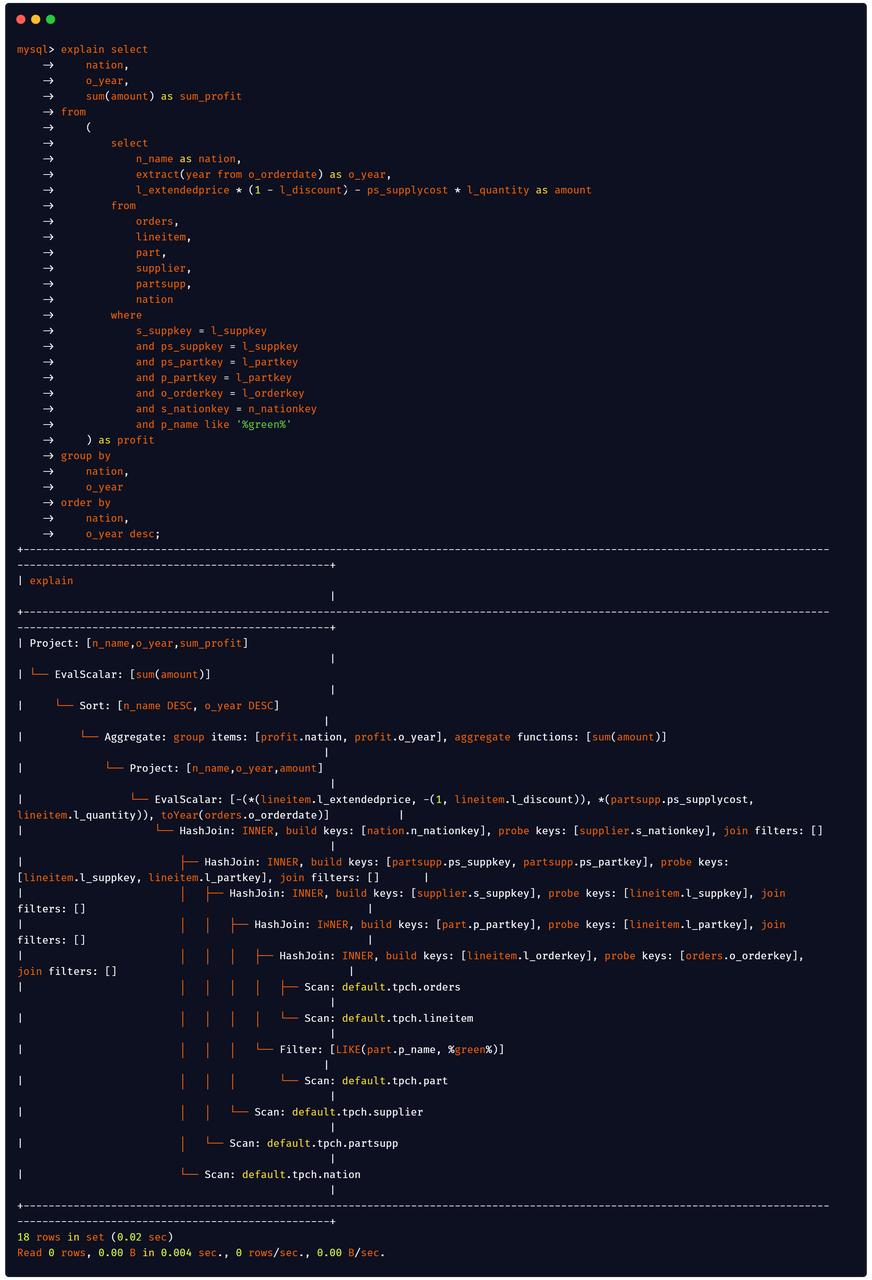
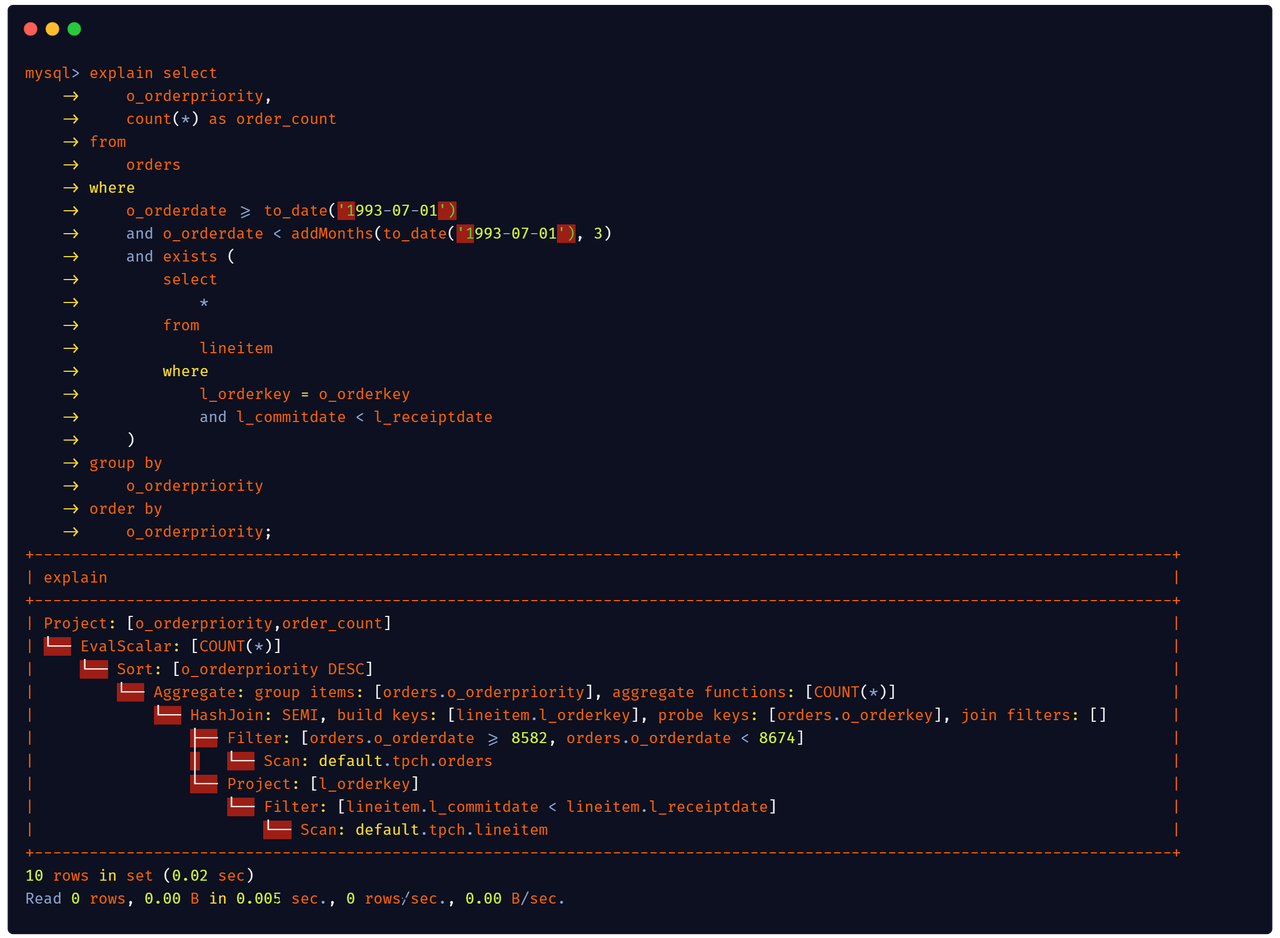
Of course! So Databend is a modern elasticity and performance cloud data warehouse. It uses the latest techniques in vectorized query processing to allow people to do blazing-fast data analytics on object storage platforms like S3, Azure Blob, or MinIO. It was mainly inspired by ClickHouse and Snowflake and focuses on online analytical processing.

How many people are currently working on the project?

Right now, we have more than 100 contributors on Databend, with about 30 of them contributing continuously.

What’s your GitHub workflow on this project?

Databend is a very new project and it doesn’t have a stable release yet, so our pull request [PR] workflow is quite simple. All our contributions go through GitHub PRs. For every PR, we use GitHub Actions as the CI, where we run cargo check, cargo fmt, cargo clippy, and all our test cases. If all the checks pass, we merge the PR. And once on the main branch, the PR runs production CI, which goes through all test cases with the release build. We then release a nightly version daily, uploading our release builds to GitHub releases and the Docker Hub Registry.

image

How many people need to approve PRs?

We need two approvals for a PR to be merged.

What are the main challenges with this workflow?

Mainly the PR merge speed! Our developers are coding in Rust, which is known for not being very good with compilation speed. We typically need about 30 minutes to finish all our checks, and most of this time is consumed by rustc, the compiler for Rust. To make Rust compile faster, we set up our own self-hosted GitHub Actions runners, which have a very high performance. Thanks to this change, our PR merge time was reduced from 60 to 30 minutes.

What made the project team start using Mergify in the first place?

Before coming across Mergify, we enabled the option on GitHub that requires code to be updated before merging. But it added a lot of work for our maintainers, who had to merge the main branch repeatedly.

image

So to make their lives easier, we implemented Mergify to update the branch automatically and merge PRs after all tests have passed.

Which Mergify features do you use the most?

The automatic merge! And with the help of the Mergify team, we enabled the merge queue feature as well. So now, we can merge multiple PRs simultaneously with only one CI check. This helped us significantly reduce the waiting time for the CI.  

What is your favorite Mergify feature and why?

Oh, I love PR actions. Although I can implement the same features with GitHub Actions, I find Mergify’s PR actions more simple and exciting. For example, last week, we introduced a new requirement that every PR must be semantic—we want all PRs to contain a valid title starting with a type like “fix”, “feat”, or “refactor”.
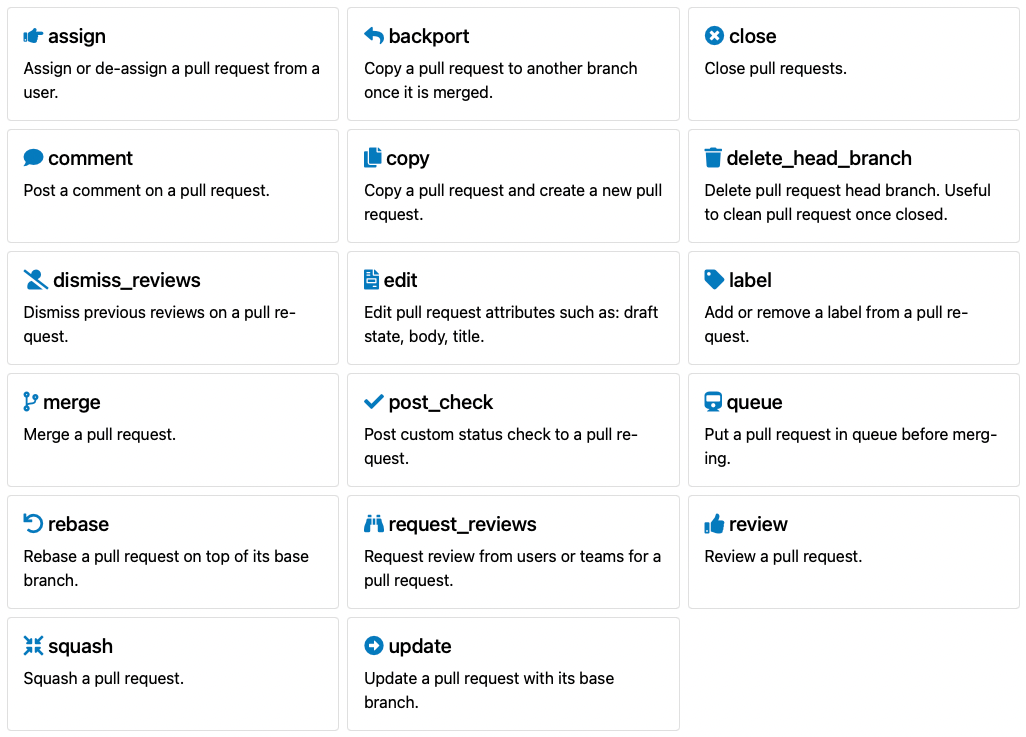
image

Actions 

With the help of Mergify, I only needed to create some rules, such as adding corresponding labels if the PR title starts with “fix”, comment in the PR with a help message if the PR title doesn’t fulfill the requirements, and add post checks so that we can mark the PR as not mergeable.

This feature is very cool, and I would love to have it on issues too!

What has been the most significant impact of using Mergify on your team’s performance so far?

Our teams don’t need to worry about merges anymore! We can start jobs without having to wait on the PRs.  

What would be your n°1 tip for someone new to Mergify?

Don’t try to migrate all your workloads to Mergify in one go. Migrating things one by one and progressively will make your lives easier.

If you had time to contribute to the Mergify project, what would your contribution be about?

I used to contribute to Mergify regarding a small documentation typo. But I am not comfortable contributing to more complex issues because Mergify uses Python, a programming language I’m unfamiliar with. But if I could contribute to one feature, it would be about commands. Mergify only supports a small set of commands. Maybe we could define new commands in PR rules and allow users to call them with Mergify bots. This feature would be exciting to me!

· 5 min read

To support complex SQL queries and improve user experience, a large-scale refactoring work for Databend's SQL planner was started several months ago. At present, the refactoring is coming to an end. You can now modify the Session settings of Databend as follows to enable the new planner for early access:

image

Feature Highlights

A more friendly query experience

Data analysts and developers usually get various errors when coding SQL queries, and troubleshooting can be a nightmare when the queries are complex. I hate MySQL's error prompts because I have coded a query with dozens of JOIN clauses.

The new planner now includes some passes for strict semantic checking so that most errors can be intercepted during the compilation. A new error prompt algorithm was also introduced to help users locate the errors. When there is invalid syntax in your SQL query (for example, misspelled keywords or missing clauses), you will receive an error message that is more instructive.

image

If your SQL query has a semantic error (for example, you reference a column that is ambiguous, or a column does not exist at all), Databend can help you locate it.

image

You can also get a better experience when coding complex queries:

image

Support for JOIN queries and correlated subqueries

The new SQL planner supports JOIN queries (INNER JOIN, OUTER JOIN, CROSS JOIN) and correlated subqueries, and provides a Hash Join algorithm to execute JOIN queries.

For more information about how to use JOIN in Databend, go to https://databend.rs/doc/reference/sql/query-syntax/dml-join

JOIN is a very important part of the OLAP query. In traditional star and snowflake schemas, we join dimensional tables with fact tables through the JOIN query to generate the resulting report.

TPC-H Benchmark is a set of OLAP query benchmarks developed by the TPC committee to evaluate the OLAP capabilities of database systems. It contains the following eight tables:

  • Lineitem: Holds product information.

  • Orders: Holds order information.

  • Customer: Holds customer information.

  • Part: Holds parts information.

  • Supplier: Holds supplier information.

  • Partsupp: Parts-Supplier Relationship Table

  • Nation: Holds nation information.

  • Region: Holds region information.

    TPC-H includes 22 complex queries, corresponding to different business needs. The new SQL planner now supports the Q9 query that calculates the profit amount for a specified year and region using a large number of JOIN calculations:

    image

    Correlated subqueries are also an essential part of SQL for coding complex queries. The Q4 query of TPC-H shows the order delivery status of various priority levels over a period of time and uses a correlated subquery with the EXISTS clause to filter overdue orders:

    image

    Brand New Architecture

    We redesigned the process of SQL parsing for the new SQL planner to support more complex semantic analysis and SQL optimization.

After the client sends a SQL statement to the databend-query server, the components in the new SQL planner process the SQL statement in the order shown in the flowchart below before returning the query result to the client:

image

The Parser starts to parse a SQL query after receiving it. If a syntax error is found during the parsing, the error information will be directly returned to the client; If the parsing is successful, an AST (Abstract Syntax Tree) for the query will be constructed.

Parser

To provide more powerful syntax analysis functions and a better development experience, we have developed a DSL (Domain Specific Language) nom-rule based on the nom Parser combinator and rewritten SQL Parser based on this framework.

With this framework, we can easily define the syntax for a statement. Taking the CREATE TABLE statement as an example, we can use DSL to describe it as follows:

image

The elegant syntax brings more fun to the work of coding a parser. Try it out if you’re interested.

Binder

After the AST is successfully parsed by the Parser, we will semantically analyze it through Binder and generate an initial logical plan. During this process, we perform different types of semantic analysis:

  • Name resolution: Check the validity of the variables referenced in the SQL query by querying the relevant table and column object information in the Databend Catalog and bind the valid variables to their corresponding objects for subsequent analysis.

  • Type check: Check the validity of the expression according to the information obtained in the name resolution, and find a proper return type for the expression.

  • Subquery unnesting: Extract the subquery from the expression and translate it into relational algebra.

  • Grouping check: For queries with aggregate calculations, check whether non-aggregate columns are referenced.

With semantic analysis, we can eliminate most semantic errors and return them to the user during the compilation to provide the best troubleshooting experience.

Optimizer

After getting the initial logical plan, the optimizer will rewrite and optimize it and, finally, generate an executable physical plan.

The new planner introduced a set of Transformer Rule-based optimizer frameworks (Volcano/Cascades). An independent rule can be implemented by defining a relational algebra sub-tree structure pattern with related transform logic.

Take Predicate Push Down as a simple example:

image

We only need to define the pattern of the input plan:

image

And then implement a conversion function:

image

Interpreter

After the physical plan is generated by the Optimizer, we will translate it into an executable pipeline and hand it over to Databend's processor execution framework for calculation.

What's Next

Building a SQL planner from the ground up is a very challenging job, but the redesign and development let us find the most suitable architecture and functionalities for the system. In the future, we will continue to improve and consolidate the new SQL planner on these functions:

  • Cost-based Optimization (CBO)

  • Distributed query optimization

  • More optimization rules

Currently, we’re in the middle of migrating to the new SQL planner. We will release an announcement when the migration is complete (around July 2022). Stay tuned.

· 7 min read

Databend, developed with Rust, is a new open-source data warehouse architected toward the cloud. It is committed to providing fast elastic expansion capabilities and a pay-as-you-go user experience. GitHub:https://github.com/datafuselabs/databend

Introduction

This post explains the Databend base: Fuse Engine, a powerful columnar storage engine. The engine was designed by the Databend community with the following principles: Powerful performance, simple architecture, and high reliability.

Before we start, check out a challenging task that Databend completed: With the Fuse Engine deployed on AWS S3, a transaction wrote 22.89 TB of raw data in around one and a half hour.

mysql> INSERT INTO ontime_new SELECT * FROM ontime_new;
Query OK, 0 rows affected (1 hour 34 min 36.82 sec)
Read 31619274180 rows, 22.89 TB in 5675.207 sec., 5.57 million rows/sec., 4.03 GB/sec.

Meanwhile, the following conditions were met as well:

  • Distributed transactions: Multiple computing nodes can read and write the same data simultaneously (This is the first problem that an architecture that separates storage from compute must solve).
  • Snapshot isolation: Different versions of data do not affect each other so you can do Zero-Copy Cloning for tables.
  • Retrospective ability: You are allowed to switch to any version of the data, so you can recover with the Time Travel feature.
  • Data merging: A new version of data can be generated after merging.
  • Simple and robust: Data relationships are described using files, and you can recover entire data system based on these files.

From above, you will find that Fuse Engine is "Git-inspired". Before introducing the design of Fuse Engine, let's take a look at how the bottom layer of Git works.

How Git Works

Git implements data version control (including branch, commit, checkout, and merge) in a distributed environment. Based on Git semantics, it is possible to create a distributed storage engine. There are also some products built on Git-like on the market, such as Nessie - Transactional Catalog for Data Lakes and lakeFS.

To better explore the underlying working mechanism of Git, we use Git semantics to complete a series of "data" operations from the perspective of the database.

  1. Prepare a file named cloud.txt with the content:
2022/05/06, Databend, Cloud
  1. Commit the file cloud.txt to Git.
git commit -m "Add cloud.txt"
  1. Git generates a snapshot (Commit ID: 7d972c7ba9213c2a2b15422d4f31a8cbc9815f71).
git log 
commit 7d972c7ba9213c2a2b15422d4f31a8cbc9815f71 (HEAD)
Author: BohuTANG <overred.shuttler@gmail.com>
Date: Fri May 6 16:44:21 2022 +0800

Add cloud.txt
  1. Prepare another file named warehouse.txt.
2022/05/07, Databend, Warehouse
  1. Commit the file warehouse.txt to Git.
git commit -m "Add warehouse.txt"
  1. Git generates another snapshot (Commit ID: 15af34e4d16082034e1faeaddd0332b3836f1424).
commit 15af34e4d16082034e1faeaddd0332b3836f1424 (HEAD)
Author: BohuTANG <overred.shuttler@gmail.com>
Date: Fri May 6 17:41:43 2022 +0800

Add warehouse.txt

commit 7d972c7ba9213c2a2b15422d4f31a8cbc9815f71
Author: BohuTANG <overred.shuttler@gmail.com>
Date: Fri May 6 16:44:21 2022 +0800

Add cloud.txt

Git now keeps two versions of the data:

ID 15af34e4d16082034e1faeaddd0332b3836f1424,Version2
ID 7d972c7ba9213c2a2b15422d4f31a8cbc9815f71,Version1

We can switch between versions by the Commit ID, which implements the functions of Time Travel and Table Zero-Copy. How does Git make it possible in the bottom layer? It's not rocket science. Git introduces these types of object files to describe the relationship:

  • Commit: Describes tree object information
  • Tree: Describes blob object information
  • Blob: Describes file information

image

HEAD File

First, we need to know the HEAD pointer:

cat .git/HEAD
15af34e4d16082034e1faeaddd0332b3836f1424

Commit File

The Commit file records metadata related to the commit, such as the current tree and parent, as well as the committer, etc.

File path:

.git/objects/15/af34e4d16082034e1faeaddd0332b3836f1424

File content:

git cat-file -p 15af34e4d16082034e1faeaddd0332b3836f1424

tree 576c63e580846fa6df2337c1f074c8d840e0b70a
parent 7d972c7ba9213c2a2b15422d4f31a8cbc9815f71
author BohuTANG <overred.shuttler@gmail.com> 1651830103 +0800
committer BohuTANG <overred.shuttler@gmail.com> 1651830103 +0800

Add warehouse.txt

Tree File

The Tree file records all the files of the current version.

File path:

.git/objects/57/6c63e580846fa6df2337c1f074c8d840e0b70a

File content:

git cat-file -p 576c63e580846fa6df2337c1f074c8d840e0b70a

100644 blob 688de5069f9e873c7e7bd15aa67c6c33e0594dde cloud.txt
100644 blob bdea812b9602ed3c6662a2231b3f1e7b52dc1ccb warehouse.txt

Blob File

The Blob files are raw data files. You can veiw the file content using git cat-file (if you use Git to manage code, blobs are the code files).

git cat-file -p 688de5069f9e873c7e7bd15aa67c6c33e0594dde
2022/05/06, Databend, Cloud

git cat-file -p bdea812b9602ed3c6662a2231b3f1e7b52dc1ccb
2022/05/07, Databend, Warehouse

Fuse Engine

Databend's Fuse Engine was designed in a way similar to Git. It introduces three description files:

  • Snapshot: Describes segment object information.
  • Segment: Describes block object information.
  • Block: Describes parquet file information.

image

Let's repeat the operations we just did with Git in Fuse Engine.

  1. Create a table.
CREATE TABLE git(file VARCHAR, content VARCHAR);
  1. Write cloud.txt to Fuse Engine.

     INSERT INTO git VALUES('cloud.txt', '2022/05/06, Databend, Cloud');
  2. Fuse Engine generates a snapshot (Snapshot ID: 6450690b09c449939a83268c49c12bb2).

    CALL system$fuse_snapshot('default', 'git');
    *************************** 1. row ***************************
    snapshot_id: 6450690b09c449939a83268c49c12bb2
    snapshot_location: 53/133/_ss/6450690b09c449939a83268c49c12bb2_v1.json
    format_version: 1
    previous_snapshot_id: NULL
    segment_count: 1
    block_count: 1
    row_count: 1
    bytes_uncompressed: 68
    bytes_compressed: 351

  3. Write warehouse.txt to Fuse Engine.

    INSERT INTO git VALUES('warehouse.txt', '2022/05/07, Databend, Warehouse');
  4. Fuse Engine generates another snapshot (Snapshot ID efe2687fd1fc48f8b414b5df2cec1e19) that is linked to the previous one (Snapshot ID: 6450690b09c449939a83268c49c12bb2).

    CALL system$fuse_snapshot('default', 'git');
    *************************** 1. row ***************************
    snapshot_id: efe2687fd1fc48f8b414b5df2cec1e19
    snapshot_location: 53/133/_ss/efe2687fd1fc48f8b414b5df2cec1e19_v1.json
    format_version: 1
    previous_snapshot_id: 6450690b09c449939a83268c49c12bb2
    segment_count: 2
    block_count: 2
    row_count: 2
    *************************** 2. row ***************************
    snapshot_id: 6450690b09c449939a83268c49c12bb2
    snapshot_location: 53/133/_ss/6450690b09c449939a83268c49c12bb2_v1.json
    format_version: 1
    previous_snapshot_id: NULL
    segment_count: 1
    block_count: 1
    row_count: 1

    Fuse Engine now keeps two versions of the data:

    ID efe2687fd1fc48f8b414b5df2cec1e19,Version2
    ID 6450690b09c449939a83268c49c12bb2,Version1

    That's very similar to Git. Right?

Git needs a HEAD as an entry. So does Fuse Engine. Check the HEAD of Fuse Engine:

SHOW CREATE TABLE git\G;
*************************** 1. row ***************************
Table: git
Create Table: CREATE TABLE `git` (
`file` VARCHAR,
`content` VARCHAR
) ENGINE=FUSE SNAPSHOT_LOCATION='53/133/_ss/efe2687fd1fc48f8b414b5df2cec1e19_v1.json'

SNAPSHOT_LOCATION is the HEAD, which by default points to the latest snapshot efe2687fd1fc48f8b414b5df2cec1e19, then how do we switch to the snapshot data whose ID is 6450690b09c449939a83268c49c12bb2? First, check the snapshot information of the current table:

CALL system$fuse_snapshot('default', 'git')\G;
*************************** 1. row ***************************
snapshot_id: efe2687fd1fc48f8b414b5df2cec1e19
snapshot_location: 53/133/_ss/efe2687fd1fc48f8b414b5df2cec1e19_v1.json
format_version: 1
previous_snapshot_id: 6450690b09c449939a83268c49c12bb2
segment_count: 2
block_count: 2
row_count: 2
*************************** 2. row ***************************
snapshot_id: 6450690b09c449939a83268c49c12bb2
snapshot_location: 53/133/_ss/6450690b09c449939a83268c49c12bb2_v1.json
format_version: 1
previous_snapshot_id: NULL
segment_count: 1
block_count: 1
row_count: 1

Then create a new table (git_v1) and point SNAPSHOT_LOCATION to the snapshot file you need:

CREATE TABLE git_v1(`file` VARCHAR, `content` VARCHAR) SNAPSHOT_LOCATION='53/133/_ss/6450690b09c449939a83268c49c12bb2_v1.json';

SELECT * FROM git_v1;
+-----------+-----------------------------+
| file | content |
+-----------+-----------------------------+
| cloud.txt | 2022/05/06, Databend, Cloud |
+-----------+-----------------------------+

Snapshot File

Stores the segment information.

File path:

53/133/_ss/efe2687fd1fc48f8b414b5df2cec1e19_v1.json

File content:

{
"format_version":1,
"snapshot_id":"efe2687f-d1fc-48f8-b414-b5df2cec1e19",
"prev_snapshot_id":[
"6450690b-09c4-4993-9a83-268c49c12bb2",
1
],

"segments":[
[
"53/133/_sg/df56e911eb26446b9f8fac5acc65a580_v1.json"
],
[
"53/133/_sg/d0bff902b98846469480b23c2a8f93d7_v1.json"
]
]
... ...
}

Segment File

Stores block information.

File path:

 53/133/_sg/df56e911eb26446b9f8fac5acc65a580_v1.json

File content:

{
"format_version":1,
"blocks":[
{
"row_count":1,
"block_size":76,
"file_size":360,
"location":[
"53/133/_b/ba4a60013e27479e856f739aefeadfaf_v0.parquet",
0
],
"compression":"Lz4Raw"
}
]
... ...
}

Block File

The underlying data of Fuse Engine uses Parquet format, and each file is composed of multiple blocks.

Summary

In the early design period (October 2021) of Databend's Fuse Engine, the requirements were very clear, but the solution selection didn't go smoothly. At that time, the Databend community investigated a large number of Table Format solutions (such as Iceberg) on the market. The challenge was to choose between using an existing solution and building a new one. Finally, we decided to develop a simple and suitable Storage Engine that uses the Parquet standard as the storage format. Fuse Engine stores the Parquet Footer separately to reduce unnecessary Seek operations, and introduces a more flexible indexing mechanism, for example, operations such as Aggregation and Join can have their own indexes for acceleration.

Feel free to deploy Fuse Engine with your object storage to have a different experience on the big data analysis: https://databend.rs/doc/deploy

Databend on GitHub: https://github.com/datafuselabs/databend

· 3 min read

Deploying Databend on Your Laptop in Minutes

Deploying a data warehouse sounds like a big job to you? Definitely NOT. Databend can be deployed to your laptop and uses the local file system as storage. You can complete the deployment in a few minutes even if you're new to Databend. Now let's get started!

tip

Databend requires a scalabe storage (for example, object storage) to work. This blog uses local file system to provide you a hands-on experience. Never use a local file system as storage for production purposes.

STEP 1. Downloading Databend

a. Create a folder named databend in the directory /usr/local. Then create the following subfolders in the folder databend:

  • bin
  • data
  • etc
  • logs

b. Download and extract the latest Databend package for your platform from https://github.com/datafuselabs/databend/releases.

c. Move the extracted files databend-meta and databend-query to the folder /usr/local/databend/bin.

STEP 2. Deploying a Standalone databend-meta

a. Create a file named databend-meta.toml in the folder /usr/local/databend/etc with the following content:

dir = "metadata/_logs"
admin_api_address = "127.0.0.1:8101"
grpc_api_address = "127.0.0.1:9101"

[raft_config]
id = 1
single = true
raft_dir = "metadata/datas"

b. Open a terminal window and navigate to the folder /usr/local/databend/bin.

c. Run the following command to start databend-meta:

./databend-meta -c ../etc/databend-meta.toml > meta.log 2>&1 &

d. Run the following command to check if databend-meta was started successfully:

curl -I  http://127.0.0.1:8101/v1/health

STEP 3. Deploying a Standalone databend-query

a. Create a file named databend-query.toml in the folder /usr/local/databend/etc with the following content:

[log]
level = "INFO"
dir = "benddata/_logs"

[query]
# For admin RESET API.
admin_api_address = "127.0.0.1:8001"

# Metrics.
metric_api_address = "127.0.0.1:7071"

# Cluster flight RPC.
flight_api_address = "127.0.0.1:9091"

# Query MySQL Handler.
mysql_handler_host = "127.0.0.1"
mysql_handler_port = 3307

# Query ClickHouse Handler.
clickhouse_handler_host = "127.0.0.1"
clickhouse_handler_port = 9001

# Query HTTP Handler.
http_handler_host = "127.0.0.1"
http_handler_port = 8081

tenant_id = "tenant1"
cluster_id = "cluster1"

[meta]
address = "127.0.0.1:9101"
username = "root"
password = "root"

[storage]
# s3
type = "fs"

[storage.fs]
data_path = "benddata/datas"

b. Open a terminal window and navigate to the folder /usr/local/databend/bin.

c. Run the following command to start databend-meta:

./databend-query -c ../etc/databend-query.toml > query.log 2>&1 &

d. Run the following command to check if databend-meta was started successfully:

curl -I  http://127.0.0.1:8001/v1/health

There you go! You have successfully deployed Databend on your computer. If you have a SQL client on your computer, try the steps below to verify the deployment:

a. Create a connection to 127.0.0.1 from your SQL client. In the connection, set the port to 3307, and set the username to root.

b. Run the following commands to check if the query is successful:

CREATE TABLE t1(a int);

INSERT INTO t1 VALUES(1), (2);

SELECT * FROM t1;